Saturday, August 31, 2013

Organizing the Craft Closet

Hi Folks,

We are going to be hosting a house full of people in 3 WEEKS!  With one bedroom ready to go, one in needs of a few items, we have an bedroom/workspace that is in desparate needs of attention.  I have a slew of craft products and in the fervor of cleaning out my closet I also purged some unnecessary items to donate (fabric, yarn, etc) but they were still needing to be organized a bit better.  I would like to note that this is not my dream craft closet but I needed to pare it down and organize everything since we are having people stay in this room.

Below is what the closet was looking like before:

Problems:
  • craft items take up TWO closets
  • not enough shelving to contain it all in one
  • not enough shelf space for non-stackable items
  • not enough organization (group like with like)


Here is the craft closet, emphasis on singular closet here.  
  • I did not purchase anything.  I used containers and boxed I already had but were just not being used efficiently.   I also moved one of the shelves from the right closet to the top most supports in the left.  
  • Grouped photo boxes that are accessed most often on the bottom shelf and stacked them.  Moved less used photo boxes to the top most shelf.
  • Group paint brushes/scissors, group glues, paints, etc.
  • Pared down my scrap fabric.  I always end up donating medium sized pieces of leftover fabric and then one or two weeks later I find a use/need for them.  But I cannot keep so much fabric with the space I have allotted, so I was forced to downsize.
  • Spare jars and containers are stored out of sight in a canvas container in the other closet on the top most shelf.
  • Wrapping paper stored vertically, gift bags and boxes consolidated to lower drawer in storage unit.


This is just part of the room refresh and I will ashamedly share the pictures of what the space looked like before and proudly share what it looks like once we're done!

Thanks and have a great Saturday!  Go Hokies!

Friday, August 30, 2013

Capsule Wardrobe Update

Here is an update about the capsule wardrobe and the break down of the pieces:

4 dresses (3 pictures below, one on the way)
  • Two casual dresses (one blue and white palm print, one navy)
  • Two dressier ones for work and occasions (One navy fit and flare not pictured and the white eyelet wrap dress)


5 Skirts
  • One dress maxi skirt (for going out)
  • One blue/white polka dot skirt
  • One white Pleated Full skirt (not pictured)
  • One pinstripe pencil skirt (not pictured)
  • One khaki tulip skirt (likely to be replaced at a later date for a sturdier one)


 6 shirts
  • Two sleeveless
  • Two short sleeve
  • Two long sleeve


3 Pairs Pants (2 not pictured)
  • One pair full length white dress pants
  • One pair comfy linen wide leg pants (not pictured)
  • One pair khakis (hopefully being exchanged for the right size as we speak)

And finally here is the pic of how little space this all takes up in my closet, which is not fully organized, hence all the other "stuff".


All that is left for me to purchase is new jeans and one or two new sweaters!  For shoes I have one pair of camel colored flats for work and one pair of sandals for casual outfits!  Almost all the pieces are completely interchangeable with the other pieces.  I calculated that theoretically with the clothes above I would have around potentially 50 possible outfits.  I cannot tell you how what is above has made getting dressed in the morning a breeze.  The clothes are classy, comfortable, and there is no excuse to schlep out of the house in anything that isn't chic.  Some of the items that I bought and plan to use year round are vintage style tees (from Old Navy) that are more casual for weekends and honestly sometimes a last resort for work when I don't get the dry cleaning back on time.  The colors are dark grey, black, and navy and they translate to almost every season.

One word of caution: make sure the care of your garments fit your schedule.  Some of the items are dry clean only and most of them can be washed but not put in the dryer.   Instead of ironing a bunch of wrinkled clothes after line drying, I just line them all up and steam them (another awesome wedding gift - the garment steamer - thanks Mom and Dad)!   

I hope this helps you pare down your wardrobe and I will try to find a nicer way to photograph the pieces and potentially the outfits once the last of the pieces arrive! 

Tuesday, August 27, 2013

Doggy Birthday Cake

Among the many luxuries our dogs are accustomed to is a special cake on their birthday.  Below is my recipe for the relatively easy and healthy birthday cake for your pup!

Ingredients:
1 bag shredded or sliced carrots (boiled and then chopped in the food processor)
1 1/2 cups of peanut butter
1/4 - 1/2 cup of flour
1 cup yogurt
Sprinkles (optional)

Steps:
  • Preheat oven to 375* F
  • Mix chopped carrots and peanut butter in food processor (blend until well mixed or smooth - whichever you prefer)

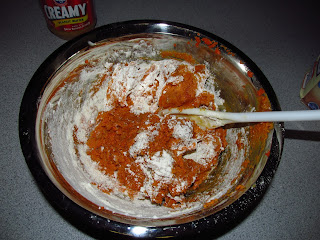
  • Transfer mixture to a separate bowl and add flour a little bit at a time until it resembles the consistency of play-dough (you'll see why later)

  • Grease corningware dishes (I use olive oil spray and wipe up the excess with a paper towel)

  • Transfer mixture into the dishes and pat down evenly.


For a small dish - 20-25 minutes
For a larger dish - 30-35 minutes
  • To check if it's cooked all the way through, insert clean blade of a sharp knife and if it comes out clean, they're done
    Allow to cool for an hour or two or even overnight.
  • Once ready to serve, we usually give our dogs 1/4 of the cake and freeze the rest for the other birthdays.


  • Dollop some yogurt on top with a few sprinkles and voila - doggy birthday cake.


I have been using this recipe for about 5 years and each year I cannot tell you how adorable it is for us to watch them eat this cake and since it's only a couple times a year, they never get sick of it!


I hope your dogs enjoy, I know ours did!

Thursday, August 22, 2013

Low Key Pasta

Hi Everyone!

The idea of a one pan pasta recipe is very appealing when you have limited time.  Since we have some nice fresh herbs and small Roma tomatoes just waiting to be picked in our container garden, I thought I ought to try it.  Below is my version of the one pan pasta with a nice vegan proteins twist.

Ingredients:
12 oz of linguine pasta
1 medium onion, sliced
5 cloves of garlic, sliced
1 to 2 cups Roma tomatoes, peeled and roughly chopped
7-8 large basil leaves, cut into ribbons
2 tablespoons fresh rosemary
One package vegan sausage
Red pepper flakes, salt, and pepper to taste
2-3 tablespoons canola oil


1.   Place oil in pan over low heat and break apart the sausage into crumbles.  Allow to brown a bit before turning to avoid clumping it together.   Sprinkle with pepper flakes and saute until browned and cooked through, then set aside.  (If you don't care about using another dish, you can keep the sausage crispy in the oven in a Corning ware dish)


2.  In the same pan, after allowing to cool for a bit, place 4 cups of water with a little bit of salt.  Turn heat up to a boil and add sliced onion, garlic, herbs, tomato pieces with dry pasta.


3.  Boil over high heat until all the water has cooked off and the pasta is cooked through but not soggy.  To avoid overcooking pasta you can wait to put the pasta in after the mixture has boiled for about 4-5 minutes.


4.  Serve up pasta and place helping of cooked sausage on top.  Salt and pepper to taste.


We added rosemary sea salt French bread rounds (from Fresh Market) instead of garlic bread.    The pasta was light and fresh with just the right amount of bite with the spicy sausage.  This would be so quick and easy for a dinner party since lots of the prep could be done the day or night before.  I hope you try and enjoy this recipe at home.


Sunday, August 18, 2013

Vegan Low Carb Shepperd's Pie

When I am training for a race it helps me to stay on track if I prepare all my meals for the week ahead of time.  Anything I can cook or bake in bulk, then freeze and heat up at work or when I get home is a huge way to save time.

The major variation here is that I am not going to use mashed potatoes, instead I use mashed cauliflower.

Mashed Cauliflower Ingredients:
2x bags of frozen cauliflower
Garlic Powder to taste
Tofutti Better Than Sour Cream 6 tablespoons
8 tablespoons hot water
Salt and Pepper to taste

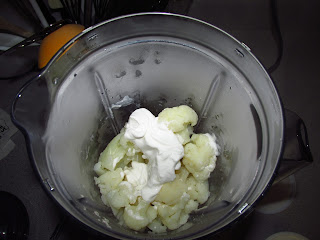
Boil florets until tender, pat dry but do not let them cool down.


In food processor blend cauliflower, Tofutti, hot water until smooth.  Trick: put the Toffuti and water in first, then the cauliflower unlike in this picture.  The blend of the water and faux sour cream helps to pull the cauliflower down near the blades so you get better blending.


Continue to blend with garlic powder, salt and pepper to taste.
Set Aside


Shepperd's Pie Filling
1 bag Boca Crumbles
1 bag frozen peas and carrots
1 bag frozen chopped onions


Over low-medium heat saute onions then add Boca crumbles until browned and cooked through.  Add frozen peas and carrots to mixture and stir.  Do not cook carrots and peas through or they will get extra soggy at the end.
Please mixture in the bottom of a baking dish 1/2 way up. 
Smooth over mashed cauliflower over filling. Sprinkle cauliflower with paprika or other garnish if wanted.

Place in 400*F oven for 40 minutes or until slightly browned on top.    


A nice lower carb option with a nice mix of protein and veggies!  Enjoy!


Saturday, August 17, 2013

Maps

So I am kind of a nerd and I have to say that the graphic maps that have been circulating online, particularly on Etsy, have caught my eye many times.  For my birthday, my brother gave me this great map of Montreal (where I was born) and my mother-in-law gave me a very nice gift card to Michaels so I was able to get a frame for it almost immediately. 

The poster is 18"x24" and it just so happened that they had some nice white frames at Michaels that were buy one get one free (more on how we used the other frame in a later post).    My only negative comment about the frames is that the pieces that hold the contents of the frame in place got stuck several times when we were trying to swivel them back into place.  Otherwise they were great.  The frames do not have matting, the frame is actually just that wide but I think the map looks great with the crisp white frame.


Since we rent and there will be no painting, we have to find a way to liven up this wood paneling in the living room.  Here is what it looked like!


Wednesday, August 14, 2013

Townhouse Overhaul: Project List

So here is the overview of all the projects that my husband and I conquered at the rental property from Saturday at 4PM until Thursday night around nine.  Keep in mind we were still both working our normal hours and did not get much sleep during this process.  But if this experience taught us anything, it's that we can get things done in limited time but at the precious cost of sleep.   I would not recommend trying this at your house or rental property.  It will leave you exhausted and there will not be enough Red Bull or Spike energy drinks to combat this.  I am pretty proud of the work we did and my parents were in town recently and were happy with the results.  The only project that we did not have the energy to complete was second coat of white semi-gloss in the bathrooms upstairs.  But all in all the house looks so much better than before, I wouldn't believe it ever looked as bad as two weeks ago if I didn't have the pictures to prove it. 

Painting:
Paint Kitchen - White
Paint Downstairs Middle and Front Rooms - White
Paint Downstairs Powder Room - Light Grey
Paint Kitchen Cabinets - Light Grey
Paint Upstairs Bathroom Vanities - Dark Grey
Paint Upstairs Bedrooms and Hallway
Paint Upstairs Bathrooms - White

Other Projects:
Refinish Bathroom Fixtures
Replace Outlet Covers
Tile Upstairs Bathroom Vanities Inside
Fix Holes in Walls
Caulking Bathrooms and Kitchen

The only posts missing from the projects above were the patching the holes and caulking.  They seems like straightforward tasks but as we move on to other projects in the house I'll try to include them.  We have discussed ripping up the linoleum floor and replacing with a slate tile, as well as refinishing the bathroom floor and possibly trying to install hardwood downstairs to avoid having to replace the carpet so often.  If any of these projects pan out, I'll be sure to blog about it!

Stay tuned for more projects!

Tuesday, August 13, 2013

Let's Talk Outlet Covers

Small, simple changes can really finish a room.  We decided to update the old and rusty electrical covers all over the rental house.  We accomplished this for just under $20 bucks.  The only replacements we couldn't find on short notice were the double switch/double socket combos.  So I decided to prime and paint them to match the fixtures I refinished earlier for the bathrooms.


For all the other rooms the best deal we found involved the contractor pack of covers.  We chose simple white ones and I really think it made the wall color pop upstairs. 


Small changes can make a big impact, particularly in smaller rooms.  Hope you found this tip helpful and give it a try at your house!


Monday, August 12, 2013

I Never Thought I'd Get Sick Of Painting....

For some strange reason, I like to paint.  I once thought that painting walls all day would be totally enjoyable.  I get a nice sense of accomplishment from projects like this and I don't mind monotonous, detail oriented projects (like cutting in by hand).  But this week I finally reached my breaking point.  Here is a breakdown of the painting overdose:

Saturday:
2 hours priming vanities

Sunday:
6 hours painting (only one coat) in downstairs rooms
6 hours painting upstairs hallway and two bedrooms
Painting first coat on vanities
Refinish fixtures

Monday:
5 hours painting 2nd coat in downstairs rooms
Prime and 1st coat of kitchen cabinets

Tuesday:
Paint downstairs bathroom
Touch ups on kitchen cabinets
3 hours painting two remaining upstairs bedrooms
2nd coat on vanity doors
Complete repainting remaining fixtures

Wednesday:
4 hours painting upstairs bathroom
Paint 2 replacement doors

Thursday:
1 hours for touch ups wherever we could spot them

So some of the painting projects I completely lost track of so I have no idea how much time they actually took.  I don't want to give the impression that I did all this painting myself, because my husband did a great deal of it but needless to say we are sick of painting.  If we don't have to painting anything for a good long while, we'd be totally fine with it.

We devised a systems mentioned in a previous post where I would cut in (edge by hand with a brush) and he would follow with a roller.  I think at one point we may have considered just breaking down and crying when we realized the contractors paint we used downstairs had horrible coverage.  As I mentioned in the bedroom wall painting post.  Just save yourself a whole lot of trouble and buy several cans of good paint.  I have been using Valspar for a few years now and I have never been disappointed.  The extra money is worth not spending the extra time put two and even sometimes three coats of paint up.  So if there is anything I can impart on you in terms of tips for painting it is that you should choose a good quality paint.   

Kitchen Before


Kitchen After


Dining Room Before


Dining Room After


Living Room Before
 

Living Room After


Bedrooms Before


Bedrooms After


Downstairs Powder Room Before


Downstairs Powder Room After


Above are the before pictures and the finished product.  I will say that though most of the projects revolved around paint, the difference is very stark from the mess the tenants left us.  The house looks like a completely different place and after having the place cleaned and carpets steam cleaned, it looked pretty good.