Saturday, June 29, 2013

Simple Lighting For Outdoor Parties

So we are having company this weekend and part of the festivities will be some good old porch lounging.  Our back porch has a row of nails along the front, that I can only assume once were used to hold up Christmas lights.  Rather than remove the nails and bother filling them in and painting over them (again we are renting), we decided to make use of them.

I have long been looking at hanging lanterns and have pined for several in World Market and Pier 1.  Alas, I can't buy everything I want when I want it.  So I saw a post on another blog about decorating mason jars and hanging them as lanterns.  Their project was mostly Moroccan themed and also there wasn't a tutorial but you could purchase them in their online store.  They were really cute but I had wanted something that was simple and easy to convert to other projects in case I got bored with them or just ended up saving up and buying the lanterns.

Supplies
As many mason jars as you want to hang (I ended up doing all the jars that came in the 12 pack)
2-3 feet of satin ribbon per jar
Battery operated tea lights
Seriously this is all you need!


I cut 2-3 feet of ribbon per jar. 


Placed the tea light in the jars, the ribbon goes under the lid (flat metal plate)


 and through the opening in the band


I put the bows (double knotted) on the top so they rest on the nails when they hang.

The tea lights I got at Michael's and they survived not one by two parties.  Once for a  Festivus party when I made them and this weekend when we had family down to visit. I don't know what the estimated battery life is, but I thought they were worth it for making it through two events, both 5-6 hours longs.  I'll make an update here when they do finally give out!


The "lanterns" are easy to make and put up/take down!

Thursday, June 27, 2013

Vegan Bisquick Banana Bread

Hi Folks,

Surprise!  Another vegan recipe.  I had some ripe bananas around and felt like baking some bread.  Then I realized, huh, not enough flour to make my usual recipe.  Yet staring me in the face was a huge Costo size box of Bisquick mix my mother had bought.  Can you make banana bread with bisquick?  Indeed you can!

Here is the recipe below.  I made slight modifications by adding applesauce instead of water for the egg substitute and also for pureeing the bananas until smooth in the food processor.

Ingredients:
2 and 1/3 cups of Bisquick mix
3 super ripe bananas, well pureed
1 teaspoon of vanilla extract
3 teaspoons of EnerG egg replacer
1 small to go container of applesauce
1 teaspoon of Smart Balance Light (Vegan)
2-3 tablespoons of regular flour or even try the bisquick

Steps
1.  Preheat the oven to 350 degrees.
2.  Puree the bananas first until very smooth.  Then add vanilla extract, egg replacer and applesauce.
3.  Since we have a 12 cup food processor, I just made the batter in there directly - no need to dirty up any other bowls.  I added the Bisquick one cup at a time and blended until smooth.
4.  Grease and flour your baking pan.
5.  Pour batter in, make sure to smooth it out into the corners a bit so it bakes evenly.
6.  Bake for 55 minutes.


Enjoy!

For a list of accidental vegan foods, check out Peta's website!

Wednesday, June 26, 2013

Cleaning Your Coffee Maker

So we were delighted to receive a 12 cup Mr. Coffee Programmable Coffee Machine with a Dispenser as a wedding gift last year.  It was awesome, we used it A LOT.  Daily, sometimes twice a day, to brew cups and cups of delicious, life-sustaining coffee and it saved me trips to the Starbucks down the street until....


It stopped brewing the water all the way through.  We eventually came the point where we would gather around just praying that the beeping noise signalling the end of brewing would not occur until at least there was a cup and a half we could split between us.  Now this is not the worst thing that has ever happened but it drove me to Starbucks more often than I should have gone (daily basically) and it's definitely a WhiteWhine sort of problem if you have ever seen that blog.

So one day I had had enough.  I was not going to spend money on extra parts, send it away to the Mr. Coffee people, or buy a new machine.  I was going to figure out why it was not working and fix it.  It turns out that this is a common problem that occurs when mineral buildup accumulates in whatever magical part of the machine heats and runs the water up to brew the coffee and it can theoretically be fixed by running equal parts water (which we took from our Brita filter to be safe) and get this... vinegar.

The idea of our precious machine potentially smelling like a bad vinaigrette was not appealing but in the end I'm glad I tried it.  I filled up 6 cups of the filtered water and 6 cups of vinegar and stood guard at the machine.  It brewed all the liquid until the very few last drops.

Now came the process of getting rid of the smell of the vinegar, which did wear off after running 3 subsequent cycles of filtered water but we did 2 more just to be safe.  After dish washing all the removable parts (plastic filter bucket, disperser container and attachments) it was cured!

Just wanted to share this tip to help you clean out your coffee machine and avoid unnecessary trips to Starbucks (though my local barristas are awesome) and also to save some money instead of immediately replacing parts!

Saturday, June 15, 2013

Vegan Peanut Butter Cups

Peanut butter and chocolate are a classic combo.  Below is a very simple vegan version that I hope you enjoy!

Ingredients:
1 bag vegan chocolate chips
6 tablespoons peanut butter
6 tablespoons of brown sugar
foil cupcake wrappers

Step 1:  Melt the chocolate in a microwave safe bowl.  Usually one bag of chips will melt nicely in about 2 minutes, pausing every 30 seconds to stir.


Step 2:  Fill the foil wrappers.  If you are quick enough, you can usually get the melted chocolate 2/3 the way up the wrapper just by tilting but don't hesitate to use a spoon to help it get up the sides.  About one and a half tablespoons of chocolate should do for each wrapper.  Put on a flat tray or plate and place in freezer for 10-20 minutes.


Step 3:  Melt peanut butter for about 1 minute and 30 seconds.  Then work in the brown sugar.  It should come out the consistency of pastry dough but you will be pressing it into the chocolate cups you just formed. Again don't hesitate to use a spoon if you need to so the peanut butter mixture gets pressed down evenly.  Don't fill it all the way up to the top but leave the chocolate higher on the sides for the next step.


Step 4.  Reheat the remaining chocolate if necessary.  Then spoon over the peanut butter mixture to cover completely, making it even with the sides.   I haven't finished smoothing the chocolate over these (below) so they look a little lumpy in the picture.


Step 5:  Put in freezer for 30 minutes or more, depending on how hungry you are! 


Store these in the freezer, keep in mind they will be frozen through so you can let them sit out for a minute or two before eating.


Thursday, June 13, 2013

Dining Room Furniture

Hi Folks,

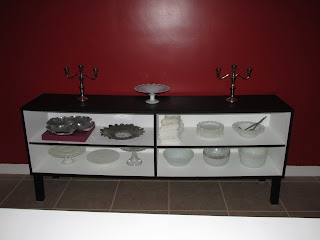
Here is new update on a project I am working on with some how-to steps included.  We have some oak furniture in our dining room that I have been contemplating repainting for some time now.  Unfortunately the pictures below were taken with my cell phone camera after we moved all the pieces out to the garage onto the drop cloth.


The oak color wasn't my favorite but I was debating what colors to choose for a long time.  Because we rent, and thus painting the walls isn't on our agenda, I tried to pick something that would work for the space. I settles on painting the table and chairs white (Ultra White in Flat Enamel by Valspar) and the buffet black (Black Magic also in Flat Enamel by Valspar) with the interior in Ultra White.

First thing I did after moving the furniture out to the garage (with some help of course) was roughly sand down any imperfections before I primed.  Remove all the hardware and store in plastic baggies so nothing gets lost.  The chairs actually needed to be disassembled so there were no uneven or bare spots where the seat meets the back.  I used Zinsner stain cover and small rollers for even coverage and small brushes for the hard to reach spots.


Once every thing was primed, I let it sit for 24 hours before sanding.  The chairs actually needed to be taken apart for painting just to make sure there weren't any spots that didn't get covered.  Wear a mask when you sand down the primer, you don't want to inhale any of the dust.  Once everything was sanded and the finish looked smooth, I started painting.  The easiest was the table which I managed to put 3 thin coats on over 3 day.  The buffet took a bit longer but mostly because I put the 3 thin coats on the shelves, waited for it to cure for a few days and then painted the tops, legs, sides and edges in black to give it contrast.  The doors for the buffet were also painted black and I ordered some new glass pulls to help give it a posh finish (more on those below). Once everything has been full painted both surface tops got a coat and buffing with Annie Sloan clear wax


UPDATE!


So, in true DIY fashion, nothing ever goes as planned but you make it work.  So after I had primed, painted and finished the pieces, we moved them back into the dining room.  Then we noticed the top of the buffet had sort of bowed in the process (? combo of the rainy weather and also new paint).  So when we go to put the doors back on, surprise surprise, they were all sorts of wonky.  After two hours of frustration and attempts at problem solving, we decided to give up.  Barring somehow propping up the top with extra pieces of wood (creating extra cubbies) which would scratch the pain or cutting down the doors (which would be a risky process), we decided we had just had enough of the buffet business.  

                                       
                                  Buffet before putting on the back and the subsequent door fiasco.

So I made an executive decision to nix the doors, make the shelves open and fill the pre-existing drill holes and paint them later.  On the other hand, the table and chairs could not have turned out better and I'm sure I'll find another project for those glass knobs, so all in all it was worth it.


Buffet sans doors but put back to work.

                                                                         Final Product

Just so you know the wax finish is already proving to be worth the cost/wait.  We waited about a week and half before christening the table with a few cocktails and good ol' game of cards.  The coating of wax repelled water but we made sure to use coasters just in case.  The buffet is also very easy to clean and even thought I left the shelves with just the enamel paint and no wax, they are holding up very nicely and are super easy to just wipe down.   

Hope you enjoy the updated post!


Sunday, June 2, 2013

DIY Striped Curtains

Hi Folks,

Here is yet another DIY Striped Curtain post.  I basically followed the tutorial from this site with a only a few modifications.


Here are the supplies:
1 biodegradable drop cloth
1 pint of Valspar flat enamel paint in Paddle
2 x 6 oz bottles of Martha Stewart Fabric Medium
Lots of Blue painters tape
Roller Brush and Paint Tray
Pencil
Long edge for drawing on the lines
1 2-pack bleached Merete curtains from Ikea

I learned the hard way but you should at least run the curtains through the dryer with some wrinkle release if not wash and dry them completely before starting this project.  If the curtains are as flat as possible it will help to keep the lines even while painting.

Steps:
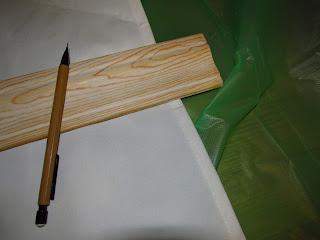
1.  I basically used the cardboard insert that came in the curtain packaging to mark off my line breaks for the stripes.  So my stripes are much wider than the one in the tutorial referenced above.    I marked off the side hems and used the straight edge (a piece of extra moulding) to make a nice even line width-wise across the curtain.


2.  Use painters tape to section off the areas to be painted.   Remember to tape off on the inside of the non-painted areas to create nice even stripes.  Run over the tape to make sure it securely sealed to minimize the paint seeping through.


3.  Mix up the paint and fabric medium in a 2:1 ratio.  I mixed one 6 oz tube of medium at a time with 12 oz of paint, just so I didn't end up with a lot of extra paint.

4.  Use roller brush to apply paint evenly.  Don't press down to hard witht he roller around the tape, even if you have pressed the tape down and sealed it well, this could lead to a bit of the paint bleeding through.  Wait for the first coat to dry completely before applying the second.


5.  Once the paint has dried for 12-24 hours, they are ready to hang.  You make notice some spots where the paint needs some touching up, but it is very easy to fill it in and easier to see these spots while it's up on the curtain rod.

6.  You're done! Sit back and admire your handiwork!

Here are the pictures of the curtains closed and open below.  I am really glad I tried this project and I hope you will be too!