Here is new update on a project I am working on with some how-to steps included. We have some oak furniture in our dining room that I have been contemplating repainting for some time now. Unfortunately the pictures below were taken with my cell phone camera after we moved all the pieces out to the garage onto the drop cloth.
The oak color wasn't my favorite but I was debating what colors to choose for a long time. Because we rent, and thus painting the walls isn't on our agenda, I tried to pick something that would work for the space. I settles on painting the table and chairs white (Ultra White in Flat Enamel by Valspar) and the buffet black (Black Magic also in Flat Enamel by Valspar) with the interior in Ultra White.
First thing I did after moving the furniture out to the garage (with some help of course) was roughly sand down any imperfections before I primed. Remove all the hardware and store in plastic baggies so nothing gets lost. The chairs actually needed to be disassembled so there were no uneven or bare spots where the seat meets the back. I used Zinsner stain cover and small rollers for even coverage and small brushes for the hard to reach spots.
 Once every thing was primed, I let it sit for 24 hours before sanding. The chairs actually needed to be taken apart for painting just to make sure there weren't any spots that didn't get covered. Wear a mask when you sand down the primer, you don't want to inhale any of the dust. Once everything was sanded and the finish looked smooth, I started painting. The easiest was the table which I managed to put 3 thin coats on over 3 day. The buffet took a bit longer but mostly because I put the 3 thin coats on the shelves, waited for it to cure for a few days and then painted the tops, legs, sides and edges in black to give it contrast. The doors for the buffet were also painted black and I ordered some new glass pulls to help give it a posh finish (more on those below). Once everything has been full painted both surface tops got a coat and buffing with Annie Sloan clear wax
UPDATE!
So, in true DIY fashion, nothing ever goes as planned but you make it work. So after I had primed, painted and finished the pieces, we moved them back into the dining room. Then we noticed the top of the buffet had sort of bowed in the process (? combo of the rainy weather and also new paint). So when we go to put the doors back on, surprise surprise, they were all sorts of wonky. After two hours of frustration and attempts at problem solving, we decided to give up. Barring somehow propping up the top with extra pieces of wood (creating extra cubbies) which would scratch the pain or cutting down the doors (which would be a risky process), we decided we had just had enough of the buffet business.

Buffet before putting on the back and the subsequent door fiasco.
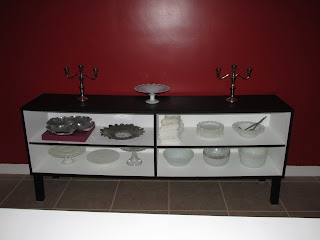
So I made an executive decision to nix the doors, make the shelves open and fill the pre-existing drill holes and paint them later. On the other hand, the table and chairs could not have turned out better and I'm sure I'll find another project for those glass knobs, so all in all it was worth it.
Buffet sans doors but put back to work.
Final Product
Just so you know the wax finish is already proving to be worth the cost/wait. We waited about a week and half before christening the table with a few cocktails and good ol' game of cards. The coating of wax repelled water but we made sure to use coasters just in case. The buffet is also very easy to clean and even thought I left the shelves with just the enamel paint and no wax, they are holding up very nicely and are super easy to just wipe down.
Hope you enjoy the updated post!


No comments:
Post a Comment